How to Create a JavaScript Weighted Random Function (NodeJS, Browser)
This article covers how to generate weighted random boolean (true and false or 1 and 0) values using JavaScript. It also contains an example of how to test and visualize the results using the command line or the browser.
In my previous article, How to Create a JavaScript Random Boolean Function (NodeJS, Browser) I showed you how to create a function (coinFlip) that had a 50 / 50 chance of returning a 1 / true or 0 / false. There are many cases, such as when initializing a simulation or creating generative art, that you may want a different ratio.
For example: you may only want 10% of the values to start out as 1 or true. For that you need to define a different type of random function. The function should use a weight or percentage argument. The weight will determine how likely the returned value will be true vs false.
Step 1. Create a project
To get started, create a new project. On a Mac I would do it like this:
mkdir -p ~/projects
cd ~/projects
mkdir js-weighted-coinflip-101
cd js-weighted-coinflip-101
Step 2. Initialize the project as a module
To use a more up to date version of JavaScript, we need to use npm to indicate that our code is a module. If that is new to you, see the link to my article on creating a JavaScript module at the end of this article.
- Run this command to create a package.json file in the root of your project:
npm init -y
- Open the project in a code editor
- Add this line to package.json under the description and save the file:
"type": "module",
Step 3. Create a JavaScript file
Use the editor to create a new file called weighted-coinflip.js or on the Mac command line:
touch weighted-coinflip.js
Step 4. Create the weighted coin flip function
For the method below the weight can be in the range of 0.0 to 1.0 to represent 0 to 100%. If the code is working correctly and you call it 100 times with a weight of 0.1, around (but not exactly) 10% of the time the response should be 1 or true. I’ll show you later in this article how to test that on the command line and visualize it in the browser.
Edit weighted-coinflip.js and add the following:
// Author: Mitch Allen
// File: weighted-coinflip.js

// weightedCoinFlip - return a random 1 or 0 based on weight
export const weightedCoinFlip = (weight) => Math.random() <= weight;
The code does the following:
- Exports a weightedCoinFlip function that returns either a true or false value
- Math.random() returns a random number between 0.0 and 1.0
- if it is less than or equal to weight then the result will be true otherwise false
- The true and false in JavaScript can be interpreted as 1 (true) or 0 (false)
Step 5. Add a test file
To test the function you can create a special test module that calls the weightedCoinFlip function x number of times. It should contain a test function that logs the result and gives you an estimate to how well the weighted argument is working.
In the example below I will show you how to use the JavaScript reduce method to count the occurrences of each return value after calling the function x number of times. Based on the results you can infer the approximate percentage and if the function is working properly.
- Create a new file called test-weighted-coinflip.js
- Paste in this code and save the file:
// Author: Mitch Allen
// File: test-weighted-coinflip.js

import {weightedCoinFlip} from './weighted-coinflip.js';

// define test function for weightedCoinFlip()
function testWeightedCoinFlip() {
    // define the number of weighted coin flips to generate
    const LIMIT = 100;

    // define the weight or chance of true being returned
    const WEIGHT = 0.1;

    // create an array filled with weighted coin flip results
    let arr = Array.from({length: LIMIT}, () => weightedCoinFlip( WEIGHT ));

    // log the generated weighted coin flips
    console.log(arr);

    // count the occurences of 1s and 0s
    let occurrences = arr.reduce((prev, curr) => (prev[curr] = ++prev[curr] || 1, prev), {});

    // log a summary of the occurences
    console.log(occurrences);
}

// call test function for weightedCoinFlip()
testWeightedCoinFlip();
The code does the following:
- imports the weightedCoinFlip function
- defines a function to test the weightedCoinFlip function
- defines a constant limit for generating an array of weighted coin flip results
- defines the weight to be used between 0.0 and 1.0
- the weight is the chance of a true being returned (0.1 = 10%)
- logs the array of weighted coin flip results
- uses the JavaScript reduce method to count the occurrences of true and false in the array
- logs the summary of the occurrences
- calls the test function
Step 6. Run the test function
To see the results of the test function, run this command from the projects folder:
node test-weighted-coinflip.js
The results should look something like this:
[
  false, false, false, false, false, false, false, true,
  false, true,  false, true,  false, false, false, false,
  false, true,  false, false, false, false, false, true,
  false, false, false, true,  false, false, false, false,
  false, false, true,  false, false, false, false, false,
  false, false, false, false, false, true,  false, false,
  false, false, false, false, false, false, false, false,
  false, false, false, false, false, false, true,  false,
  false, false, false, true,  false, false, true,  false,
  true,  false, false, false, false, false, false, false,
  false, false, false, false, false, false, false, false,
  false, false, true,  false, false, false, false, false,
  false, false, false, false
]
{ false: 87, true: 13 }
- all but the last line is the array of results
- the last line is the summary of the occurrences
- if you run it several times the summary may never show an exact 10 / 90 split
- sometimes you may even see close to a 30 / 70 split
- but most runs should result in no more than a 20 / 80 split
Step 7. Run the test in a browser
To better visualize the results, I’m now going to show you how to map them to a grid in a browser using a canvas element and a few simple drawing commands.
- Create a file called index.html in the root of your project
- Paste in this code and save it:
<html>

<head>
  <title>js-weightedCoinFlip-01</title>
  <link rel="stylesheet" href="./app.css">
</head>

<body>
  <canvas id="canvas" width="300" height="300" />
  <script type="module" src="./app.js">
  </script>
</body>

</html>
The code does the following:
- defines a header section
- defines a title to appear in the browser tab
- loads a stylesheet (app.css) that will need to be created
- defines a body section
- defines canvas element where we will draw a grid to visualize a series of calls to the weightedCoinFlip function
- loads a script module (app.js) that will need to be created
Step 8. Create a stylesheet
To keep things neat and simple you can use a stylesheet to draw the canvas in the middle of the screen.
- In the root of the project create a file called app.css
- Paste in the code below and save the file:
/**
 * Author: Mitch Allen
 * File: app.css
 */

canvas {
    padding: 0;
    margin: auto;
    display: block;
    width: 400px;
    height: 400px;
    position: absolute;
    top: 0;
    bottom: 0;
    left: 0;
    right: 0;
}
The code does the following:
- centers the canvas element in the middle of the screen
Step 9. Create the app file
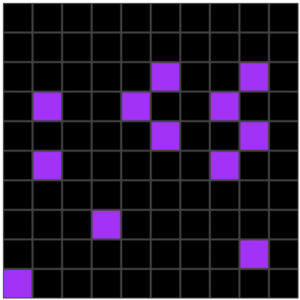
In this step you define a JavaScript module to be loaded and run by the index.html file every time the page loads. The module will initialize a set of 100 weightedCoinFlip results using a weight of 0.1 (10%). The results should be converted to a 10 x 10 grid for easy display.
If the code is working correctly only about 10% of the cells in the grid, representing the true / 1 results, should be highlighted.
- In the root of the project create a file called app.js
- Paste in the code below and save the file:
// Author: Mitch Allen
// File: app.js

import { weightedCoinFlip } from './weighted-coinflip.js';

let canvas = document.getElementById("canvas");
const SCREEN_SIZE = 300;
const DIM = 10;
const CELL_SIZE = SCREEN_SIZE / DIM;
const WEIGHT = 0.1;
const BORDER = 1;
const NEON_PURPLE = "#B026FF";
// create an array filled with coin flip results
const arr = Array.from({ length: DIM * DIM }, () => weightedCoinFlip( WEIGHT ));
console.log(arr);
// draw canvas
let ctx = canvas.getContext('2d');
if (ctx) {
    // draw background
    ctx.clearRect(0, 0, SCREEN_SIZE, SCREEN_SIZE);
    ctx.fillStyle = "#444444";
    ctx.fillRect(0, 0, SCREEN_SIZE, SCREEN_SIZE);
    // draw cells
    let cursor = 0;
    for (let i = 0; i < DIM; i++) {
        for (let j = 0; j < DIM; j++) {
            ctx.fillStyle = arr[cursor++] ? NEON_PURPLE : "black";
            ctx.fillRect(
                i * CELL_SIZE + BORDER,
                j * CELL_SIZE + BORDER,
                CELL_SIZE - BORDER * 2,
                CELL_SIZE - BORDER * 2
            );
        }
    }
}
The code does the following:
- gets a handle to the canvas element in the HTML
- defines a series of constants
- to simplify the code a square will be drawn where width and height are the same constants
- SCREEN_SIZE is the width and height of the canvas element (it should match the canvas width and height attributes)
- DIM is the row and columns of the grid to represent each call to weightedCoinFlip which will be shown in a grid “cell”
- CELL_SIZE calculates the size of a cell to draw on the screen by dividing the screen size by the number of rows or columns
- WEIGHT defines the chance of a true being returned
- BORDER is the border size to leave empty around each cell
- NEON_PURPLE is an HTML constant for a neon color to fill each true cell with
- an array of random weightedCoinFlips is filled with results
- the length of the array is DIM x DIM to the number of results to fill a DIM x DIM grid (10 x 10 cells = 100 results needed)
- the arr (array) values are logged to the console which you can view in the browser via the debugger / inspector console window
- a context handle to the canvas object is created for drawing
- the context is cleared and replaced with a background color
- a cursor for looping through the array is created
- inner and outer loops for converting the array to a grid are defined
- if a result in the array was true a neon color cell is drawn, otherwise a darker cell is drawn
- adjustments are made to draw the cell slightly smaller so it appears to have a border around it
Step 10. Test the project in the Chrome browser
You have to run the code through a local Web server.
- On a Mac you can serve the files from the current folder using this command:
python -m SimpleHTTPServer $PORT || 8000
- Leave that command running
- Open up the Chrome browser and browse to:
http://localhost:8000/
To see different results, reload the browser window.
Source Code
Conclusion
In this article you learned how to:
- generate a function that returns a weighted random boolean result
- write another function to test the results using the command line
- use the canvas object in a browser to visualize the results
Related Articles
- How to Create a JavaScript Random Boolean Function (NodeJS, Browser)
- How to Select a JavaScript Random Array Item (NodeJS, Browser)
- How to Create a JavaScript Module (NodeJS, Browser)
References
- Math.random() – [1]